-This is a cobbled together docuement of my experiences, of getting this to work on ESXi 8.0. There is no source material or official documentation to reference, only techniques.
Download of the image
REF: https://wiki.batocera.org/install_batocera
REF: https://batocera.org/download
-Go to https://batocera.org/download, and download the Desktop PC version of the file
-The file will be something like batocera-x86_64-43.1-20260529.img.gz
Prepping image to upload to ESXi
-uncompress the batocera-x86_64-43.1-20260529.img.gz with WinRAR to an an IMG file
-rename this IMG file to the that you want to name of your VM, like batocera.img
-Run Starwind V2V converter, and choose [Local file], then click [Next >]
-Click on [...] then parse to the IMG file, and click [Open]
-Choose [Local File] then click [Next >]
-Choose [VMDK], then click [Next >]
-Select [ESXi pre-allocated image], then click [Next >]
-Let the tool convert the file
-When it is done you will get 2 files, a .vmdk file and a -flat.vmdk file, these will be needed for the next step
Creating a VM for batocera
-go to the host and create a machine with the following properties please make sure that the VM name is the same as the converted IMG file:
Name: batocera
OS: Linux
OS Verion: Debian GNU/Linux 10 (32-bit)
Version: 8.0
CPU: 6 or 8
Memory: 4 GB
HardDisk: 10 GB
Controller: IDE Controller 0, Master
SCSI: LSI Logic Paralell
-One thing that is definetly not normal is that the HardDisk is attached to the IDE channel, not the standard SCSI channel.
-Stil playin with the OS and OS version to see if can use other versions, want the newest one that will work.
Manually inject the new virtual disk
-Since we are given a hard disk image, and no way to install Batocera, we need to replace the hard driver image with the one converted from the download
-Open up Filezilla and connect to our host
-Parse to the location of the virtual machine
-rename batocera.vmdk to batocera.vmdk.ori
-rename batocera-flat.vmdk to batocer-flat.vmdk.ori
-Upload batocera.vmdk, and batocera-flat.vmdk
Change the Virtual Machine to use 3d graphics
REF: https://knowledge.broadcom.com/external/article/326319/enable-3d-support-option-is-greyed-out-i.html
-connect to the ESXi server with filezilla
-Parse to the vmx file, and download it
-Add the following line to the file, notepad++ works well:
mks.enable3d = TRUE
-Upload the modified vmx file.
-Log into the ESXi server via SSH:
# vim-cmd vmsvc/getallvms
-find out the virtual machine ID by running the following command:
# vim-cmd vmsvc/reload <VMID>
-Go back to the WebGUI and edit the VM, if you go to the properties of the Video card and now you can change the following values:
Total video Memory: 1024MB
3D Memory: 512MB
Starting up VM, and current limitations
-To start, just start the VM
-This is just a proof of concept, so currently can only control it via keyboard and mouse. Know this is built for a controller, and will look into that
-Is only using emulated Video card, looking into adding a dedicated NVIDA or AMD GPU to the VM, that should really improve the performance of the system
Linxu-Batocera install on ESXi
-This is a cobbled together docuement of my experiences, of getting this to work on ESXi 8.0. There is no source material or official documentation to reference, only techniques.
Download of the image
REF: https://wiki.batocera.org/install_batocera
REF: https://batocera.org/download
-Go to https://batocera.org/download, and download the Desktop PC version of the file
-The file will be something like batocera-x86_64-43.1-20260529.img.gz
Prepping image to upload to ESXi
-uncompress the batocera-x86_64-43.1-20260529.img.gz with WinRAR to an an IMG file
-rename this IMG file to the that you want to name of your VM, like batocera.img
-Run Starwind V2V converter, and choose [Local file], then click [Next >]
-Click on [...] then parse to the IMG file, and click [Open]
-Choose [Local File] then click [Next >]
-Choose [VMDK], then click [Next >]
-Select [ESXi pre-allocated image], then click [Next >]
-Let the tool convert the file
-When it is done you will get 2 files, a .vmdk file and a -flat.vmdk file, these will be needed for the next step
Creating a VM for batocera
-go to the host and create a machine with the following properties please make sure that the VM name is the same as the converted IMG file:
Name: batocera
OS: Linux
OS Verion: Debian GNU/Linux 10 (32-bit)
Version: 8.0
CPU: 6 or 8
Memory: 4 GB
HardDisk: 10 GB
Controller: IDE Controller 0, Master
SCSI: LSI Logic Paralell
-One thing that is definetly not normal is that the HardDisk is attached to the IDE channel, not the standard SCSI channel.
-Stil playin with the OS and OS version to see if can use other versions, want the newest one that will work.
Manually inject the new virtual disk
-Since we are given a hard disk image, and no way to install Batocera, we need to replace the hard driver image with the one converted from the download
-Open up Filezilla and connect to our host
-Parse to the location of the virtual machine
-rename batocera.vmdk to batocera.vmdk.ori
-rename batocera-flat.vmdk to batocer-flat.vmdk.ori
-Upload batocera.vmdk, and batocera-flat.vmdk
Change the Virtual Machine to use 3d graphics
REF: https://knowledge.broadcom.com/external/article/326319/enable-3d-support-option-is-greyed-out-i.html
-connect to the ESXi server with filezilla
-Parse to the vmx file, and download it
-Add the following line to the file, notepad++ works well:
mks.enable3d = TRUE
-Upload the modified vmx file.
-Log into the ESXi server via SSH:
# vim-cmd vmsvc/getallvms
-find out the virtual machine ID by running the following command:
# vim-cmd vmsvc/reload <VMID>
-Go back to the WebGUI and edit the VM, if you go to the properties of the Video card and now you can change the following values:
Total video Memory: 1024MB
3D Memory: 512MB
Starting up VM, and current limitations
-To start, just start the VM
-This is just a proof of concept, so currently can only control it via keyboard and mouse. Know this is built for a controller, and will look into that
-Is only using emulated Video card, looking into adding a dedicated NVIDA or AMD GPU to the VM, that should really improve the performance of the system
Sometimes you plan for expansion, other times it is thrust upon you.
The other day my primary workstation just died. Here is what it was:
- Intel Q6600
- 8GB RAM
- Radeon RX 570
- 5 drives, total of ~8 TB of data
Not knowing if the problem was the motherboard, processor, or power supply, decided to junk it, pull the drives and video card and go with a new machine.
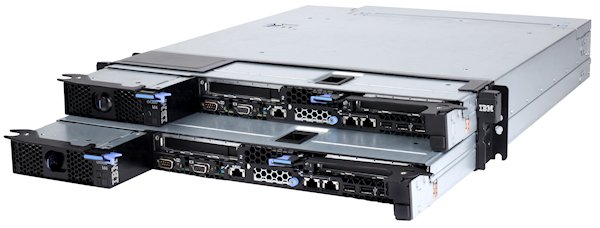
Now I normally build my workstations, I enjoy it, but since I was caught with a loss of functionality, I wanted to get back up and running quickly I decided to repurpose one of my ESXi Servers, an IBM DX360 M4. Here is the info about it from Lenovo:
The machine is built with the following:
- E5-2650 (2)
- 32GB of memory
It is it a little overkill, probably, but it is what I have, and there are a couple of advantages:
- When idle, only uses about 100W
- When idle, the fan speed, and noise is relatively low.
- It has 32 cores with Hyperthreading
- It has 32GB, and there are 12 more RAM slots available
- It can handle 250W video cards, so my RX570 will be child's play for it
- With the GPU Tray, I get 2 x16 PCIe slots, for a total of 4 PCIe slots. Also I get the option of adding a 2nd HDD / SSD into the system.
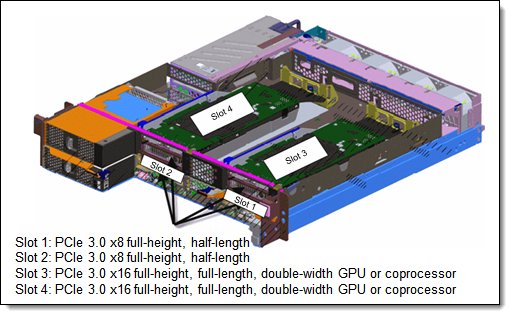
But it has a couple of disadvantages:
- Only has two Drive bays.
- Doesn't have USB3.0
- No sound
- Very difficult to find a power cable for PCI-e video card!!
To get it running it needed a couple of things:
After about a week, I am pretty happy with this computer. Pretty quiet, great on productivity, and even without the RX570 installed, works OK with games.
Normally use Shadow.tech for gaming, but once RX570 is up and running, might cancel this service.
Interesting things that I learned
I use a VPN from time to time. Before when downloading, I wold get from 8.5 to 9.8 MB/s down. Now I get 10.00 down. That is because on my MOCA adapter, it has a 100mbit port and OpenVPN is not multi-threaded, so I am saturating the port, and almost a whole core to do VPN traffic.
There are USB 3.0 cards out there that don't need a SATA / MOLEX connector in order to work like this from Inateck or LTERIVER. This is important with a server that doesn't have additional power ports available inside of the device. I am considering an external JBOD chassis from SYBA for adding more drives to the system.
Using Server hardware as Primary Workstation
Sometimes you plan for expansion, other times it is thrust upon you.
The other day my primary workstation just died. Here is what it was:
- Intel Q6600
- 8GB RAM
- Radeon RX 570
- 5 drives, total of ~8 TB of data
Not knowing if the problem was the motherboard, processor, or power supply, decided to junk it, pull the drives and video card and go with a new machine.
Now I normally build my workstations, I enjoy it, but since I was caught with a loss of functionality, I wanted to get back up and running quickly I decided to repurpose one of my ESXi Servers, an IBM DX360 M4. Here is the info about it from Lenovo:
The machine is built with the following:
- E5-2650 (2)
- 32GB of memory
It is it a little overkill, probably, but it is what I have, and there are a couple of advantages:
- When idle, only uses about 100W
- When idle, the fan speed, and noise is relatively low.
- It has 32 cores with Hyperthreading
- It has 32GB, and there are 12 more RAM slots available
- It can handle 250W video cards, so my RX570 will be child's play for it
- With the GPU Tray, I get 2 x16 PCIe slots, for a total of 4 PCIe slots. Also I get the option of adding a 2nd HDD / SSD into the system.
But it has a couple of disadvantages:
- Only has two Drive bays.
- Doesn't have USB3.0
- No sound
- Very difficult to find a power cable for PCI-e video card!!
To get it running it needed a couple of things:
After about a week, I am pretty happy with this computer. Pretty quiet, great on productivity, and even without the RX570 installed, works OK with games.
Normally use Shadow.tech for gaming, but once RX570 is up and running, might cancel this service.
Interesting things that I learned
I use a VPN from time to time. Before when downloading, I wold get from 8.5 to 9.8 MB/s down. Now I get 10.00 down. That is because on my MOCA adapter, it has a 100mbit port and OpenVPN is not multi-threaded, so I am saturating the port, and almost a whole core to do VPN traffic.
There are USB 3.0 cards out there that don't need a SATA / MOLEX connector in order to work like this from Inateck or LTERIVER. This is important with a server that doesn't have additional power ports available inside of the device. I am considering an external JBOD chassis from SYBA for adding more drives to the system.
Updated: 2020.02.26
This is a living review of Crashplan for Small Business 7. Please refer back to it frequently because the plan is to continuously review it and update the community that either rely on or are considering CrashPlan after its directional change to only supply the Small Business and Enterprise versions
On Feb 20, adding my notes and updates with the 7.7.0 Build 883 update, all differences will be noted with
(7.7.0-new)
Previous History:
- Was very familiar with and used extensively the 4.x version for home for all my backups. It contained over 10 personal workstation and servers in my household running multiple versions of Windows and Linux
- Infrastructure configuration contained 1 "server" that housed backups of all my other machines. CrashPlan Home had the very powerful ability where it could store backups in the Cloud, which were CrashPlan's servers, and also had the ability to send backups to another machine in your account. Essentially you could designate a device of your own choosing to collect all the backups of other devices.
- Completely destroyed my 4.x infrastructure once it was announced that the Home product was being discontinued, and used other methods for backup; did not wait for the EOL date or conversion to CrashPlan Pro reduced rate.
I really liked CrashPlan Home Version. It was powerful. It had the ability to backup whatever I wanted to the cloud and also the ability to send backups to another device attached to your account. I had over 10 machines sending backups to 1 device, and that became my "server". Yes it was a peer to peer infrastructure, but it had a lot of advantages. It was fast, it encrypted all my data, and it was resilient, the software just worked and everything I need was backed up in one location. Restores were fast and it did save me from times when I needed to recover data.
I have accepted that the new product that Code42 has given us is different. From my 60 days evaluating it I have noticed the following things:
- The client is less powerful than the previous Home version; all peer to peer functions have been stripped out.
- The client is slower, both on communication to Code42's servers over the internet, to local drives, and remote drives within my own network. The program throughput is less than what my disk and network subsystems can provide, so I have to conclude either the code is throttled, or less efficient.
- With the loss of the Peer-to-peer functionality, The client does not like working with network connectivity.
- Mapping network drives does not work
- iSCSI does work, so a remote location to backup is possible, but still slow **This has been improved with optimizations, please continue to read**.
I wanted to love the new CrashPlan for Business. After 20 days of usage, can only sort of like it. After 60 days of usage, it is not bad and I can learn to live with its directions
- (NEG) Despite the hard coded file exclusions, it backups up a lot of data. Personally I miss that I cannot backup virtual disk files like .vdi or .vmdk, but knowing that I can take alternative measures to back it up
- (NEG-20 Days) The slowness is annoying especially when copying to a local location to the client, but once your dataset is built, keeping is up to date is a painless process
- (NEG-60 Days) Local and remote backups are are capped at the ~7 Mbs bandwidth, not great, but I am OK with it as long as It keeps working at that rate. This means it will take a week to backup 1TB, but after the initial backup, keeping my date up to date will be simple
- (POS)It defaults to backup continuously, so once your data is backed up, keeping it up to date is a automatic process
- (POS) Really, really like using iSCSI as a local destination for my clients. Very versatile and resilient. If my iSCSI disk is offline, local backups are not available, once it becomes available, Crashplan starts right up and backs up, no reboot of client, no restart of service.
- (POS) $10/month for unlimited backup of client to cloud is cheap and really easy to plan for. Don't have to worry about cost of upload / download transfer and storage costs
- (POS) (7.7.0-new) I started up the Crashplan client after a 7 days and it did a deep pruning, and backed up 30GB to my online and onsite repository in under 7 hours, that feels like an improvement. Trying to look for evidence in logs
The Great workaround
OK, so the new CrashPlan for small business is not perfect, but I have developed a workaround that will work and it pretty clean. I want a solution where my data is backed up in 2 locations; first in the cloud and second on-site that is not on the same machine where my data is. This is my workaround.
- Setup an iSCSI target to hold all of your local data. I can be Windows, Linux or BSD. I am using StarWind Software Virtual San because Windows because my primary OS that I am familiar with was only doing 2 nodes and it was proof of concept
- Create a LUN for each machine you want to backup and set up for each client. My test Laptop has a 20 GB LUN, and my test desktop has a 1.05 GB LUN
- Provide each client you wish to backup a new drive letter, in my case with Windows clients, it was the R: Drive
- Configure Crashplan for one backup set to the cloud, and another backup set the R: drive for local backups.
- Use script robocopy and copy over all the standard excluded files in CrashPlan files like *.vdi, *.vmdk. They wont be backed up into the cloud but at least you will have a second copy of them.
- If you don't want to use CrashPlan for your local backup, robocopy everything over to the R: drive
Here is my robocopy script, I needed to add the attrib command because there is a bug where robocopy will sometimes hide the destination directory:
robocopy g:\ R:\backup_robocopy_G *.vdi *.vfd *.vhd *.vmdk *.vmem *.vmsd *.vmx *.vmxf /S /PURGE /XD $RECYCLE.BIN OneDriveTemp Recoverybin /A-:SH
attrib -s -h R:\backup_robocopy_G
I think this is a decent workaround. I know if you don't decide to use CrashPlan for you local backups, then setting up an iSCSI target might be overkill, but if it is used for some, then the process is consistent and with iSCSI, you don't need to map network drives, it just attaches as long as the client and server are up.
UPDATE: 2019.10.24 After doing tweaks and overcoming my stall, which I documented below, it has been smooth sailing.
Feel free to comment here or on
reddit
Tweaks for Better Perfomance
I am researching what will improve performance to speed up backups, here is my attempts and how they behaved.

- Increase CPU usage on Idle / Active from 80 / 20 to 100 / 100. After changing this setting I was seeing higher CPU usage but no where total CPU usage. I have suspected and a Crashplan technician confirmed that the engine is not multi threaded, so with a 2 core system, will max CPU Usage at 50%, 4 cores, 25%
- Exclude the backup directory (R:\backup_Crashplan) and the Crashplan cache (C:\Programdata\crashplan\cache) from Microsoft Defender or any other virus scanners. There is no need to scan the CrashPlan files, let Microsoft Defender focus on the source files.
- Exclude large files that are already highly compressed like .mkv, .pst, .rar, .ress (Data files from the game Tacoma), and .zip by modifying the file C:\ProgramData\CrashPlan\conf\my.service.xml. Here is my exemptions:
- (7.7.0-new) The file my.service.xml is now gone, and I cannot find any xml file that would offer any control. I do know that my exemptions are still in place because I can see evidence of it in the following files:
- C:\ProgramData\CrashPlan\log\service.log.0
- C:\ProgramData\CrashPlan\log\app.log
For local backups from my client to a remote drive via iSCSI, I sometimes get 35 Mbps for highly compressible data, but for mostly compressed data I get 6 to 7 Mbps. Cloud backups I normally see from 5 to 7 Mbps. I see no improvement on backups to crashplan.com so something on their side or how the engine is programmed that is slowing things down.
Watching for Stalls and Rectify - 2019.10.23
In my instance, local backup were just stopped at 29% for days and would not go anywhere. I could see that the engine was running, but nothing was backing up and nothing was being written to the log file C:\ProgramData\CrashPlan\log\backup_files.log.0 that was useful
Using Resource Monitor I could see it was spending a lot of time reading the file sharedassets3.assets.ress in a directory for the game Tacoma. It was a 2GB file and it never backed up, but it was always working with that file.
I surmised that CrashPlan was trying to compress this file and was having difficulty. Once I exempted the extension of .ress, it was moved right into the destination without incident.
Turned a corner and not looking back - 2019.11.06
Since the 23rd, CrashPlan has been continuing to do a local backup and just before the start of the month it finished, I now have my 1TB of crucial data backed up on the CrashPlan servers, and on a local iSCSI disk. And I have to say it is pretty good. With average usage, I generate 7 to 15 GB of new data or overwrite of previous data, and the the system can handle it without breaking a sweat.
I have done test restores from remote and local data, and the process has been clean, my data is backed up and able to be recovered if the need arrises. Granted I only backup 2 machines, and the second will be decommissioned soon because it was always a Proof of Concept, but while the behavior of Crashplan, is different, I consider this tool much more of an asset than a liability for me to use.
Latest update - 2021.03.01
CrashPlan has done some updates, like moving to version 8.5.0, and now they are Code42, but it has still performed reliably for me. Earlier this year I needed to cutover to a new computer, and the migration was painless, and I am still protected. Yes it is limited to uploads of 700 KB/s but with only 1.6 TB of data, it works tirelessly to keep a copy of my data safe. For me the possibility change my cost for $10/month to $6/month is not worth the hassle at this time.
Review of Crashplan 7 on Windows
Updated: 2020.02.26
This is a living review of Crashplan for Small Business 7. Please refer back to it frequently because the plan is to continuously review it and update the community that either rely on or are considering CrashPlan after its directional change to only supply the Small Business and Enterprise versions
On Feb 20, adding my notes and updates with the 7.7.0 Build 883 update, all differences will be noted with
(7.7.0-new)
Previous History:
- Was very familiar with and used extensively the 4.x version for home for all my backups. It contained over 10 personal workstation and servers in my household running multiple versions of Windows and Linux
- Infrastructure configuration contained 1 "server" that housed backups of all my other machines. CrashPlan Home had the very powerful ability where it could store backups in the Cloud, which were CrashPlan's servers, and also had the ability to send backups to another machine in your account. Essentially you could designate a device of your own choosing to collect all the backups of other devices.
- Completely destroyed my 4.x infrastructure once it was announced that the Home product was being discontinued, and used other methods for backup; did not wait for the EOL date or conversion to CrashPlan Pro reduced rate.
I really liked CrashPlan Home Version. It was powerful. It had the ability to backup whatever I wanted to the cloud and also the ability to send backups to another device attached to your account. I had over 10 machines sending backups to 1 device, and that became my "server". Yes it was a peer to peer infrastructure, but it had a lot of advantages. It was fast, it encrypted all my data, and it was resilient, the software just worked and everything I need was backed up in one location. Restores were fast and it did save me from times when I needed to recover data.
I have accepted that the new product that Code42 has given us is different. From my 60 days evaluating it I have noticed the following things:
- The client is less powerful than the previous Home version; all peer to peer functions have been stripped out.
- The client is slower, both on communication to Code42's servers over the internet, to local drives, and remote drives within my own network. The program throughput is less than what my disk and network subsystems can provide, so I have to conclude either the code is throttled, or less efficient.
- With the loss of the Peer-to-peer functionality, The client does not like working with network connectivity.
- Mapping network drives does not work
- iSCSI does work, so a remote location to backup is possible, but still slow **This has been improved with optimizations, please continue to read**.
I wanted to love the new CrashPlan for Business. After 20 days of usage, can only sort of like it. After 60 days of usage, it is not bad and I can learn to live with its directions
- (NEG) Despite the hard coded file exclusions, it backups up a lot of data. Personally I miss that I cannot backup virtual disk files like .vdi or .vmdk, but knowing that I can take alternative measures to back it up
- (NEG-20 Days) The slowness is annoying especially when copying to a local location to the client, but once your dataset is built, keeping is up to date is a painless process
- (NEG-60 Days) Local and remote backups are are capped at the ~7 Mbs bandwidth, not great, but I am OK with it as long as It keeps working at that rate. This means it will take a week to backup 1TB, but after the initial backup, keeping my date up to date will be simple
- (POS)It defaults to backup continuously, so once your data is backed up, keeping it up to date is a automatic process
- (POS) Really, really like using iSCSI as a local destination for my clients. Very versatile and resilient. If my iSCSI disk is offline, local backups are not available, once it becomes available, Crashplan starts right up and backs up, no reboot of client, no restart of service.
- (POS) $10/month for unlimited backup of client to cloud is cheap and really easy to plan for. Don't have to worry about cost of upload / download transfer and storage costs
- (POS) (7.7.0-new) I started up the Crashplan client after a 7 days and it did a deep pruning, and backed up 30GB to my online and onsite repository in under 7 hours, that feels like an improvement. Trying to look for evidence in logs
The Great workaround
OK, so the new CrashPlan for small business is not perfect, but I have developed a workaround that will work and it pretty clean. I want a solution where my data is backed up in 2 locations; first in the cloud and second on-site that is not on the same machine where my data is. This is my workaround.
- Setup an iSCSI target to hold all of your local data. I can be Windows, Linux or BSD. I am using StarWind Software Virtual San because Windows because my primary OS that I am familiar with was only doing 2 nodes and it was proof of concept
- Create a LUN for each machine you want to backup and set up for each client. My test Laptop has a 20 GB LUN, and my test desktop has a 1.05 GB LUN
- Provide each client you wish to backup a new drive letter, in my case with Windows clients, it was the R: Drive
- Configure Crashplan for one backup set to the cloud, and another backup set the R: drive for local backups.
- Use script robocopy and copy over all the standard excluded files in CrashPlan files like *.vdi, *.vmdk. They wont be backed up into the cloud but at least you will have a second copy of them.
- If you don't want to use CrashPlan for your local backup, robocopy everything over to the R: drive
Here is my robocopy script, I needed to add the attrib command because there is a bug where robocopy will sometimes hide the destination directory:
robocopy g:\ R:\backup_robocopy_G *.vdi *.vfd *.vhd *.vmdk *.vmem *.vmsd *.vmx *.vmxf /S /PURGE /XD $RECYCLE.BIN OneDriveTemp Recoverybin /A-:SH
attrib -s -h R:\backup_robocopy_G
I think this is a decent workaround. I know if you don't decide to use CrashPlan for you local backups, then setting up an iSCSI target might be overkill, but if it is used for some, then the process is consistent and with iSCSI, you don't need to map network drives, it just attaches as long as the client and server are up.
UPDATE: 2019.10.24 After doing tweaks and overcoming my stall, which I documented below, it has been smooth sailing.
Feel free to comment here or on
reddit
Tweaks for Better Perfomance
I am researching what will improve performance to speed up backups, here is my attempts and how they behaved.
- Increase CPU usage on Idle / Active from 80 / 20 to 100 / 100. After changing this setting I was seeing higher CPU usage but no where total CPU usage. I have suspected and a Crashplan technician confirmed that the engine is not multi threaded, so with a 2 core system, will max CPU Usage at 50%, 4 cores, 25%
- Exclude the backup directory (R:\backup_Crashplan) and the Crashplan cache (C:\Programdata\crashplan\cache) from Microsoft Defender or any other virus scanners. There is no need to scan the CrashPlan files, let Microsoft Defender focus on the source files.
- Exclude large files that are already highly compressed like .mkv, .pst, .rar, .ress (Data files from the game Tacoma), and .zip by modifying the file C:\ProgramData\CrashPlan\conf\my.service.xml. Here is my exemptions:
- (7.7.0-new) The file my.service.xml is now gone, and I cannot find any xml file that would offer any control. I do know that my exemptions are still in place because I can see evidence of it in the following files:
- C:\ProgramData\CrashPlan\log\service.log.0
- C:\ProgramData\CrashPlan\log\app.log
For local backups from my client to a remote drive via iSCSI, I sometimes get 35 Mbps for highly compressible data, but for mostly compressed data I get 6 to 7 Mbps. Cloud backups I normally see from 5 to 7 Mbps. I see no improvement on backups to crashplan.com so something on their side or how the engine is programmed that is slowing things down.
Watching for Stalls and Rectify - 2019.10.23
In my instance, local backup were just stopped at 29% for days and would not go anywhere. I could see that the engine was running, but nothing was backing up and nothing was being written to the log file C:\ProgramData\CrashPlan\log\backup_files.log.0 that was useful
Using Resource Monitor I could see it was spending a lot of time reading the file sharedassets3.assets.ress in a directory for the game Tacoma. It was a 2GB file and it never backed up, but it was always working with that file.
I surmised that CrashPlan was trying to compress this file and was having difficulty. Once I exempted the extension of .ress, it was moved right into the destination without incident.
Turned a corner and not looking back - 2019.11.06
Since the 23rd, CrashPlan has been continuing to do a local backup and just before the start of the month it finished, I now have my 1TB of crucial data backed up on the CrashPlan servers, and on a local iSCSI disk. And I have to say it is pretty good. With average usage, I generate 7 to 15 GB of new data or overwrite of previous data, and the the system can handle it without breaking a sweat.
I have done test restores from remote and local data, and the process has been clean, my data is backed up and able to be recovered if the need arrises. Granted I only backup 2 machines, and the second will be decommissioned soon because it was always a Proof of Concept, but while the behavior of Crashplan, is different, I consider this tool much more of an asset than a liability for me to use.
Latest update - 2021.03.01
CrashPlan has done some updates, like moving to version 8.5.0, and now they are Code42, but it has still performed reliably for me. Earlier this year I needed to cutover to a new computer, and the migration was painless, and I am still protected. Yes it is limited to uploads of 700 KB/s but with only 1.6 TB of data, it works tirelessly to keep a copy of my data safe. For me the possibility change my cost for $10/month to $6/month is not worth the hassle at this time.
With the little help of the internet, a little trial and error, and previous knowledge, I was able to get pfSense setup to use the VPN service provided by EasyNews. This was done for the following reasons.
- Price is good for the VPN servers about $12 and it gets you access to NNTP servers
- Logging in not kept and many VPN endpoints
- Already have it and why not use what already paying for
- No one has a tutorial on how to setup pfSense with EasyNews VPN, so good to be the first
Please note that these directions were originally built for pfSense
2.2.5-6, but then finished on pfSense 2.3.1. While the directions are
almost the same, did not see the need or had the time to redo the
pictures that were in the 2.2.x format.
Creating an Internal CA
Creating a local certificate from the Internal CA
Create the CA Certificate
- Select menu item: System->Cert Manager
- Select CAs tab
- Click Plus symbol to add CA Certificate
- Configure as follows:
- Descriptive Name = EasynewsVPN
- Method = Import an existing Certificate Authority (Location of certificate is here)
--BEGIN CERTIFICATE--
--END CERTIFICATE--
- Certificate Private Key = Leave Blank
- Serial for Next Certificate = Leave Blank
- Click Save
[
ref1],[
ref2]
Create OpenVPN Client
- Select menu: VPN->OpenVPN
- Select Client tab
- Click Plus symbol to add client
- Configure as Follows:
- Disabled = unchecked
- Server Mode = Peer To Peer (SSL/TLS)
- Protocol = UDP
- Device Mode = TUN
- Interface = WAN
- Server Host Address = nyc-a01.wlvpn.com (or other server address from EasyNews. full list is here)
- Server Port = 1194 or 443
- Proxy Host or address = (Leave Blank)
- Proxy Port = (Leave Blank)
- Proxy Authentication Extra Options = none
- Server host name resolution = Checked
- Description = easynewsVPN (or whatever you want)
- Username = username@easynews
- Password = (Your password for easynews)
- TLS Authentication = Unchecked
- Peer Certificate Authority = easynewsVPN
- Client Certificate = None
- Encryption Algorithm = AES-256-CBC (256-bit)
- Auth Digest Algorithm = SHA1 (160 bit)
- Hardware Crypto = No Hardware Crypto Acceleration
- IPv4 Tunnel Network = (leave blank)
- IPv6 Tunnel Network = (leave blank)
- IPv4 Remote Network/s = (leave blank)
- IPv6 Remote Network/s = (leave blank)
- Limit outgoing bandwidth = (leave blank)
- Compression = No Preference
- Type of Service = Unchecked
- Disable IPv6 = Checked
- Don't Pull routes = Unchecked
- Don't add/remove routes = Unchecked
- Advanced remote-cert-tls server
resolv-retry infinite
persist-key
persist-tun
persist-remote-ip
comp-lzo
verb 3
auth SHA256
keysize 256
tls-cipher DHE-RSA-AES256-SHA
auth-nocache
- Click Save


[
ref1],[
ref2]
Updates of custom settings from other implementations
Other documents detailed of the advanced settings as thus:
remote-cert-tls server
resolv-retry infinite
persist-key
persist-tun
persist-remote-ip
comp-lzo
verb 3
auth SHA256
keysize 256
tls-cipher DHE-RSA-AES256-SHA
but my configuration is as this:
remote-cert-tls server
resolv-retry infinite
persist-key
persist-tun
persist-remote-ip
comp-lzo
verb 3
auth SHA256
keysize 256
tls-cipher TLS-DHE-RSA-WITH-AES-256-CBC-SHA
auth-nocache
I changed the tls-cypher because when opening connection, the logs said that DHE-RSA-AES256-SHA was depreciated and TLS-DHE-RSA-WITH-AES-256-CBC-SHA should be used.
Also there was a warning that credentials were cached and adding auth-nocache would be more secure. Since the connection still worked with these extra settings, I left them in place
Create new Interface for OpenVPN
- Go to [Interfaces -> Assign]
- Under {Interface Assignments} there will be "Available Network Ports", drop down to ovpnc1() and click ADD, the Network interface OPT1 will be created
- Click on the OPT1 interface to edit it.
- Configure as follow:
- Description: ENVPN
- IPv4 Configuration Type: None
- IPv6 Configuration Type: None
- MAC Controls: Leave blank
- MTU: Leave Blank
- MSS: Leave Blank
- Block Private Network: Unchecked
- Block Bogon Network: Unchecked
- Save this configuration
Configure NAT Rules
- Go to [Firewall -> NAT]
- Go to {Outbound}
- Change from "Automatic outbound NAT rule generation. (IPsec passthrough included)" to "Manual Outbound NAT rule generation. (AON - Advanced Outbound NAT)"
References:
https://www.privateinternetaccess.com/pages/client-support/pfsense
http://www.giganews.com/support/vyprvpn/vpn-setup/dd-wrt/openvpn.html
https://forum.pfsense.org/index.php?topic=35292.0
https://www.easynews.com/vpn/setup.html#ubuntu
https://www.easynews.com/vpn/setup.html#routers
https://support.code42.com/CrashPlan/4/Configuring/Excluding_Networks_Used_For_Backup_And_Restore
https://www.reddit.com/r/OpenVPN/comments/3tmfjz/showing_connected_to_vpn_but_still_getting_actual/
pfSense router and EasyNews VPN
With the little help of the internet, a little trial and error, and previous knowledge, I was able to get pfSense setup to use the VPN service provided by EasyNews. This was done for the following reasons.
- Price is good for the VPN servers about $12 and it gets you access to NNTP servers
- Logging in not kept and many VPN endpoints
- Already have it and why not use what already paying for
- No one has a tutorial on how to setup pfSense with EasyNews VPN, so good to be the first
Please note that these directions were originally built for pfSense
2.2.5-6, but then finished on pfSense 2.3.1. While the directions are
almost the same, did not see the need or had the time to redo the
pictures that were in the 2.2.x format.
Creating an Internal CA
Creating a local certificate from the Internal CA
Create the CA Certificate
- Select menu item: System->Cert Manager
- Select CAs tab
- Click Plus symbol to add CA Certificate
- Configure as follows:
- Descriptive Name = EasynewsVPN
- Method = Import an existing Certificate Authority (Location of certificate is here)
--BEGIN CERTIFICATE--
--END CERTIFICATE--
- Certificate Private Key = Leave Blank
- Serial for Next Certificate = Leave Blank
- Click Save
[
ref1],[
ref2]
Create OpenVPN Client
- Select menu: VPN->OpenVPN
- Select Client tab
- Click Plus symbol to add client
- Configure as Follows:
- Disabled = unchecked
- Server Mode = Peer To Peer (SSL/TLS)
- Protocol = UDP
- Device Mode = TUN
- Interface = WAN
- Server Host Address = nyc-a01.wlvpn.com (or other server address from EasyNews. full list is here)
- Server Port = 1194 or 443
- Proxy Host or address = (Leave Blank)
- Proxy Port = (Leave Blank)
- Proxy Authentication Extra Options = none
- Server host name resolution = Checked
- Description = easynewsVPN (or whatever you want)
- Username = username@easynews
- Password = (Your password for easynews)
- TLS Authentication = Unchecked
- Peer Certificate Authority = easynewsVPN
- Client Certificate = None
- Encryption Algorithm = AES-256-CBC (256-bit)
- Auth Digest Algorithm = SHA1 (160 bit)
- Hardware Crypto = No Hardware Crypto Acceleration
- IPv4 Tunnel Network = (leave blank)
- IPv6 Tunnel Network = (leave blank)
- IPv4 Remote Network/s = (leave blank)
- IPv6 Remote Network/s = (leave blank)
- Limit outgoing bandwidth = (leave blank)
- Compression = No Preference
- Type of Service = Unchecked
- Disable IPv6 = Checked
- Don't Pull routes = Unchecked
- Don't add/remove routes = Unchecked
- Advanced remote-cert-tls server
resolv-retry infinite
persist-key
persist-tun
persist-remote-ip
comp-lzo
verb 3
auth SHA256
keysize 256
tls-cipher DHE-RSA-AES256-SHA
auth-nocache
- Click Save
[
ref1],[
ref2]
Updates of custom settings from other implementations
Other documents detailed of the advanced settings as thus:
remote-cert-tls server
resolv-retry infinite
persist-key
persist-tun
persist-remote-ip
comp-lzo
verb 3
auth SHA256
keysize 256
tls-cipher DHE-RSA-AES256-SHA
but my configuration is as this:
remote-cert-tls server
resolv-retry infinite
persist-key
persist-tun
persist-remote-ip
comp-lzo
verb 3
auth SHA256
keysize 256
tls-cipher TLS-DHE-RSA-WITH-AES-256-CBC-SHA
auth-nocache
I changed the tls-cypher because when opening connection, the logs said that DHE-RSA-AES256-SHA was depreciated and TLS-DHE-RSA-WITH-AES-256-CBC-SHA should be used.
Also there was a warning that credentials were cached and adding auth-nocache would be more secure. Since the connection still worked with these extra settings, I left them in place
Create new Interface for OpenVPN
- Go to [Interfaces -> Assign]
- Under {Interface Assignments} there will be "Available Network Ports", drop down to ovpnc1() and click ADD, the Network interface OPT1 will be created
- Click on the OPT1 interface to edit it.
- Configure as follow:
- Description: ENVPN
- IPv4 Configuration Type: None
- IPv6 Configuration Type: None
- MAC Controls: Leave blank
- MTU: Leave Blank
- MSS: Leave Blank
- Block Private Network: Unchecked
- Block Bogon Network: Unchecked
- Save this configuration
Configure NAT Rules
- Go to [Firewall -> NAT]
- Go to {Outbound}
- Change from "Automatic outbound NAT rule generation. (IPsec passthrough included)" to "Manual Outbound NAT rule generation. (AON - Advanced Outbound NAT)"
References:
https://www.privateinternetaccess.com/pages/client-support/pfsense
http://www.giganews.com/support/vyprvpn/vpn-setup/dd-wrt/openvpn.html
https://forum.pfsense.org/index.php?topic=35292.0
https://www.easynews.com/vpn/setup.html#ubuntu
https://www.easynews.com/vpn/setup.html#routers
https://support.code42.com/CrashPlan/4/Configuring/Excluding_Networks_Used_For_Backup_And_Restore
https://www.reddit.com/r/OpenVPN/comments/3tmfjz/showing_connected_to_vpn_but_still_getting_actual/
OK, I know there are people there that love Windows 8, and those that don't really like it. I am not going to debate that here, but lets say, I need to advance with the times because of my job and will use Windows 8, and try to get the most out of it
Having said that, I work with servers, so my main system is Windows 2012. Now on first look Windows 2012 looks a lot like Windows 8, so why cannot my Windows 2012 system also be my Windows 8 system. Now I don't want a completely transformed OS, but try to get the best of both worlds. So here are the things that I did to my system and hopefully guide you on your transformation. And for why I did this, I can say only 1 thing: I want to play Halo: Spartan Strike on my computer along with my phone.
Add the Desktop Experience
This is a straight forward process, just adding a feature called 'Desktop Experience' If you need directions on how to add
this web site has it.
Please remember in order you use the Windows App store, you need a Microsoft account, and your logon account cannot be administrator.
Install Halo: Spartan Strike
Go to the Windows store and install it. Now this application is not free, and for some reason I could not purchase it within the application store, but I used my phone to purchase because it is a single purchase for phone and desktop, so once that was done, it installed fine on Windows 2012
Issue with running app and Xinput1_4.dll
Halo: Spartan Strike installed, but when it ran I was getting an Xinput1_4.dll error, and it bombed out. I found
better description of the error here, and then
another page that comes with files and an install script
The script is straight forward and comes with 6 files. Now I normally don't trust these files especially since they are not signed, and I didn't want to expose my system to any unscrupulous files, so I built a Virtual Windows 8, and extracted the same files to install into my 2012 system. I did compare my files to the downloaded files, and they were same on the binary level, but better safe than sorry.
Once those files were added the program worked fine, and I am hoping that all other DirectX games will also behave as well.
Issue with keyboard - Halo: Spartan Strike
Now the program is running but for some reason, the mouse works, but the keyboard does not. For me fixing that is a simple solution. My system has PS/2 keyboard and mouse, so I just add my USB wireless Logitech K400 keyboard, now the game works!!!
Better Gaming experience - Xbox 360 Game controller
I have a working game, but using the keyboard is a little kludgey because the key choices are chosen and you cannot change them, also with the AWSD to move, it is a little choppy.
So I picked up a used Rock Candy controller. It plugged in fine, but didn't work. Went to the vendor's web site, pdp.com and they state the controller is for Xbox 360, so there are no drivers for windows.
Well not being discourage, went looking for a driver for a Microsoft Xbox 360 drivers from Microsoft and found them
here.
Installed the driver, rebooted, and the controller worked fine. It plays like a dream and now I can spend all of my time killing the Covenant!!
I hope my work will enable you to play this game with Windows 2012, and your system primed to play other games from Windows Store.
Virtual Windows 8 ... Sort of.
OK, I know there are people there that love Windows 8, and those that don't really like it. I am not going to debate that here, but lets say, I need to advance with the times because of my job and will use Windows 8, and try to get the most out of it
Having said that, I work with servers, so my main system is Windows 2012. Now on first look Windows 2012 looks a lot like Windows 8, so why cannot my Windows 2012 system also be my Windows 8 system. Now I don't want a completely transformed OS, but try to get the best of both worlds. So here are the things that I did to my system and hopefully guide you on your transformation. And for why I did this, I can say only 1 thing: I want to play Halo: Spartan Strike on my computer along with my phone.
Add the Desktop Experience
This is a straight forward process, just adding a feature called 'Desktop Experience' If you need directions on how to add
this web site has it.
Please remember in order you use the Windows App store, you need a Microsoft account, and your logon account cannot be administrator.
Install Halo: Spartan Strike
Go to the Windows store and install it. Now this application is not free, and for some reason I could not purchase it within the application store, but I used my phone to purchase because it is a single purchase for phone and desktop, so once that was done, it installed fine on Windows 2012
Issue with running app and Xinput1_4.dll
Halo: Spartan Strike installed, but when it ran I was getting an Xinput1_4.dll error, and it bombed out. I found
better description of the error here, and then
another page that comes with files and an install script
The script is straight forward and comes with 6 files. Now I normally don't trust these files especially since they are not signed, and I didn't want to expose my system to any unscrupulous files, so I built a Virtual Windows 8, and extracted the same files to install into my 2012 system. I did compare my files to the downloaded files, and they were same on the binary level, but better safe than sorry.
Once those files were added the program worked fine, and I am hoping that all other DirectX games will also behave as well.
Issue with keyboard - Halo: Spartan Strike
Now the program is running but for some reason, the mouse works, but the keyboard does not. For me fixing that is a simple solution. My system has PS/2 keyboard and mouse, so I just add my USB wireless Logitech K400 keyboard, now the game works!!!
Better Gaming experience - Xbox 360 Game controller
I have a working game, but using the keyboard is a little kludgey because the key choices are chosen and you cannot change them, also with the AWSD to move, it is a little choppy.
So I picked up a used Rock Candy controller. It plugged in fine, but didn't work. Went to the vendor's web site, pdp.com and they state the controller is for Xbox 360, so there are no drivers for windows.
Well not being discourage, went looking for a driver for a Microsoft Xbox 360 drivers from Microsoft and found them
here.
Installed the driver, rebooted, and the controller worked fine. It plays like a dream and now I can spend all of my time killing the Covenant!!
I hope my work will enable you to play this game with Windows 2012, and your system primed to play other games from Windows Store.
There have been other blogs and kbase articles that define how to get Windows 8/8.1 or Windows 2012 / 2012 R2 running under vSphere 4.1. I plan to to offer you a complete document with references
For the guest configuration, I would choose the following:
Windows 2012 / 2012 R2
Guest OS: Windows 2008 R2
vCPU: 2
vMemory: 2GB
Network Card: E1000
Windows 8 / 8.1
Guest OS: Windows 7 (32 or 64 to match your media)
vCPU: 2, but 1 should work
vMemory: 1GB, but 2 would be better
Network Card: E1000
After you build the OS, but before the OS is installed the VMX file needs to be modified, so use the vSphere client to do these steps
- Browse to the datastore where the VMX files is located
- Download the VMX file to your windows system
- Edit the file with a Linux compatible editor like Notepad++ and add the following lines:
- bios440.filename = bios.440.rom
mce.enable = "TRUE"
cpuid.hypervisor.v0 = "FALSE"
vmGenCounter.enable = "FALSE
Then upload the updated VMX file and the bios ROM file from this
location. If you feel a little unsure about using a random file acquired from the internet there are directions on how to
extract the file from VMware Player. I have not done this yet, but trust the ROM file that is the VMware community
Next just install the OS as normal, it should work fine, no BSOD.
Now what I have not seen is anything on VMware tools, and from what it looks like any version of the VMware tools that come with 4.1 will corrupt the video and make it unusable, so when installing VMware tools, use the OSP version.
Here is the root location of all the tools:
http://packages.vmware.com/tools/esx/index.html
Here is the version that I have used successfully:
http://packages.vmware.com/tools/esx/5.5p01/windows/index.html
But guessing the latest which is for vSphere 6 would also work:
If you want read more about OSP tools, this
page is useful.
Good luck with your Window 8 / 2012 builds!!
Getting Windows 8 or 2012 to work as a guest under vSphere 4.1
There have been other blogs and kbase articles that define how to get Windows 8/8.1 or Windows 2012 / 2012 R2 running under vSphere 4.1. I plan to to offer you a complete document with references
For the guest configuration, I would choose the following:
Windows 2012 / 2012 R2
Guest OS: Windows 2008 R2
vCPU: 2
vMemory: 2GB
Network Card: E1000
Windows 8 / 8.1
Guest OS: Windows 7 (32 or 64 to match your media)
vCPU: 2, but 1 should work
vMemory: 1GB, but 2 would be better
Network Card: E1000
After you build the OS, but before the OS is installed the VMX file needs to be modified, so use the vSphere client to do these steps
- Browse to the datastore where the VMX files is located
- Download the VMX file to your windows system
- Edit the file with a Linux compatible editor like Notepad++ and add the following lines:
- bios440.filename = bios.440.rom
mce.enable = "TRUE"
cpuid.hypervisor.v0 = "FALSE"
vmGenCounter.enable = "FALSE
Then upload the updated VMX file and the bios ROM file from this
location. If you feel a little unsure about using a random file acquired from the internet there are directions on how to
extract the file from VMware Player. I have not done this yet, but trust the ROM file that is the VMware community
Next just install the OS as normal, it should work fine, no BSOD.
Now what I have not seen is anything on VMware tools, and from what it looks like any version of the VMware tools that come with 4.1 will corrupt the video and make it unusable, so when installing VMware tools, use the OSP version.
Here is the root location of all the tools:
http://packages.vmware.com/tools/esx/index.html
Here is the version that I have used successfully:
http://packages.vmware.com/tools/esx/5.5p01/windows/index.html
But guessing the latest which is for vSphere 6 would also work:
If you want read more about OSP tools, this
page is useful.
Good luck with your Window 8 / 2012 builds!!
This is a modified procedure to use a local file instead of the blacklist from urlblacklist.com. This is a modified procedure for Squidguard. It should be able to go to the website directly and download then update.
From my experience lately either the download doesn't finish, or if it does finish. it doesn't use the full size. So this modified procedure will use Firefox to download, transfer to a Linux Web server, then let it pull from a local source
- Download the file bigblacklist.tar.gz from http://urlblacklist.com/cgi-bin/commercialdownload.pl?type=download&file=bigblacklist
- Use WinSCP to copy to Linux box with web server
- Log into Linux box and copy bigblacklist.tar.gz to /var/www
- Go to pfSense box and login
- Services -> Proxy Filter, find the field blacklist URL, enter http://ipaddress/bigblacklist.tar.gz
- Go to the Tab 'Blacklist' click [download]
- Wait until complete
Updataing blacklist in pfSense from urlblacklist.com
This is a modified procedure to use a local file instead of the blacklist from urlblacklist.com. This is a modified procedure for Squidguard. It should be able to go to the website directly and download then update.
From my experience lately either the download doesn't finish, or if it does finish. it doesn't use the full size. So this modified procedure will use Firefox to download, transfer to a Linux Web server, then let it pull from a local source
- Download the file bigblacklist.tar.gz from http://urlblacklist.com/cgi-bin/commercialdownload.pl?type=download&file=bigblacklist
- Use WinSCP to copy to Linux box with web server
- Log into Linux box and copy bigblacklist.tar.gz to /var/www
- Go to pfSense box and login
- Services -> Proxy Filter, find the field blacklist URL, enter http://ipaddress/bigblacklist.tar.gz
- Go to the Tab 'Blacklist' click [download]
- Wait until complete
Syncing this Blog with other media sources
In order to get more exposure of this blog, I decided to publish this blog automatically onto other sources like Facebook, Twitter, and Linkedin. So far I just started with Facebook and hopefully this set of directions will work:
http://www.earning66.blogspot.com/2012/06/publish-your-posts-on-facebook-using.html
Update 2014.01.13: added the ability to publish to twitter using twitterfeed.
Windows 8 / 2012 on ESXi 4.0 / 4.1 hosts
OK, so others have documented on how to enable using Windows 8 and Server 2012 with an ESXi 4.0 / 4.1 host. I am not going to recreate the procedure, but here are links to some:
http://communities.vmware.com/thread/394669
http://community.spiceworks.com/topic/312358-how-to-install-windows-2012-server-on-esxi-4-1
http://en.blog.skydriver.org/2013/02/03/windows-server-2012-and-windows-8-on-vmware-esxi-4-1/
What I was curious about was where this bios.440.rom file came from and is it safe. From the first reference from the VMware communities it came from a vmware employee. Did some more searching and found these two sites that detailed building / modifying BIOS-es
http://forums.mydigitallife.info/threads/19329-HOWTO-Modify-VMWare-BIOS-with-SLIC-2-1
While it was detailed, and looked like it used some files that were coming from questionable sources, the original toolkit was sound
http://www.bios.net.cn/Files/soft/biosfile/qt/SLIC_ToolKit_V3.2.rar
So I concluded to accept the file and not research further.
OK, so last month, I cane across
Microsoft Intune last month and wanted to see what it could do. Hey they were giving me a month and I figured why not. I can say that after a month, it is not bad, and does have it's place in the world out there.
In the past I have used other products to manage systems. Tools like WSUS, Qualys, and Tivoli Endpoint Manager or TEM.
So what does Intune do. From what I see it does three big things:
- Install Microsoft Patches
- Manage Windows Defender
- Have the ability to publish software that can be installed by your clients.
Whey you sign up you need to create a company account and at least one administrator account. I didn't really work much with the company account, but can see where there is a need for separation between the two. Also there are different permissions for administrators like read only so there can be multiple persons that can get access to the account and the systems managed.
OK so what I like. I like that you as an administrator have the ability to approve patches like in WSUS. When a patch comes out, you have to approve it and then it will be available for installation on your infrastructure.
Another think that I like is that you can take an MSI and add it to your list of company apps. So if you want to deploy something like Adobe Acrobat, just add it and publish.
Also like the ability to create groups. I didn't use them, but it was nice they were there.
So now my favorite feature: Due dates on patches. One thing you can do is assign due date and Install now. This means that if a client is on, the Intune app will get pushed the patches, so you don't have to visit the clients, they will update themselves.
Now it is not all great with Intune, and here are some of my issues with it. First all of the connectivity is to the internet, so all of your machines that you manage need to have access to the internet. Also with this connectivity, there are slew of
them to configure. So it might be challenging for a company that has an IDS or proxy installed.
There was one last feature that I did not test and it was the easy assist. This looks like the Lync client so you can have your computer remote controlled by the administrator. Maybe I will look to it in the future.
So down to
pricing. From what I can see, in the US it is a low, low $6 a month for a year. It looks like you sign up for a year at a time, but can be billed monthly. And if I am reading it right, that is the cost for the administrator, not for the clients. So if you have 2 machines or 25, the price would be the same.
I stopped at 25 because that is the limit of my license that I was given. I am guessing that as you increase the number of endpoints, that the cost would also increase, but I cannot find that information.
Pros
- Easy to set up
- Pricing good
- Handles Microsoft patches very well
Cons
- Only supports Vista, Windows 7 and 8
- client need internet connection to work
First impressions about Microsoft Intune
OK, so last month, I cane across
Microsoft Intune last month and wanted to see what it could do. Hey they were giving me a month and I figured why not. I can say that after a month, it is not bad, and does have it's place in the world out there.
In the past I have used other products to manage systems. Tools like WSUS, Qualys, and Tivoli Endpoint Manager or TEM.
So what does Intune do. From what I see it does three big things:
- Install Microsoft Patches
- Manage Windows Defender
- Have the ability to publish software that can be installed by your clients.
Whey you sign up you need to create a company account and at least one administrator account. I didn't really work much with the company account, but can see where there is a need for separation between the two. Also there are different permissions for administrators like read only so there can be multiple persons that can get access to the account and the systems managed.
OK so what I like. I like that you as an administrator have the ability to approve patches like in WSUS. When a patch comes out, you have to approve it and then it will be available for installation on your infrastructure.
Another think that I like is that you can take an MSI and add it to your list of company apps. So if you want to deploy something like Adobe Acrobat, just add it and publish.
Also like the ability to create groups. I didn't use them, but it was nice they were there.
So now my favorite feature: Due dates on patches. One thing you can do is assign due date and Install now. This means that if a client is on, the Intune app will get pushed the patches, so you don't have to visit the clients, they will update themselves.
Now it is not all great with Intune, and here are some of my issues with it. First all of the connectivity is to the internet, so all of your machines that you manage need to have access to the internet. Also with this connectivity, there are slew of
them to configure. So it might be challenging for a company that has an IDS or proxy installed.
There was one last feature that I did not test and it was the easy assist. This looks like the Lync client so you can have your computer remote controlled by the administrator. Maybe I will look to it in the future.
So down to
pricing. From what I can see, in the US it is a low, low $6 a month for a year. It looks like you sign up for a year at a time, but can be billed monthly. And if I am reading it right, that is the cost for the administrator, not for the clients. So if you have 2 machines or 25, the price would be the same.
I stopped at 25 because that is the limit of my license that I was given. I am guessing that as you increase the number of endpoints, that the cost would also increase, but I cannot find that information.
Pros
- Easy to set up
- Pricing good
- Handles Microsoft patches very well
Cons
- Only supports Vista, Windows 7 and 8
- client need internet connection to work
For the last couple of years I have been using FreeNAS 7.x for my go to simple fileshare tool within my ESX infrastructure.
Well as we all know that platform has reached the end of life, and at first the natural progression was to use FreeNAS 8. Well I liked it, but it has a completely different GUI, and I just could not get the hang of it.
So last month I found out there is a new branch of FreeNAS7, NAS4Free. I have just started to install it and get it configured, but I recommend using this web site to get a jump on things:
NAS4Free under ESXi at liquidobject.com
NAS4Free in ESXi
For the last couple of years I have been using FreeNAS 7.x for my go to simple fileshare tool within my ESX infrastructure.
Well as we all know that platform has reached the end of life, and at first the natural progression was to use FreeNAS 8. Well I liked it, but it has a completely different GUI, and I just could not get the hang of it.
So last month I found out there is a new branch of FreeNAS7, NAS4Free. I have just started to install it and get it configured, but I recommend using this web site to get a jump on things:
NAS4Free under ESXi at liquidobject.com
Know this is a little off base for my blog, but hey it is kind of virtual, and it is useful. The other day I picked up a new Blue-Ray player and it had DLNA capabilities, so I wanted to try it and test it out with a DLNA server.
Did some research with
Wikipedia and the one product came to the front,
Mezzemo. I gave it a try and while the software was easy to set up, I was having a very difficult time to get it to work with my
Sony BDP-S590, and only 1 file was playing. Did some further research and there were many other persons saying that this model was giving it some problem.
So today I was doing some work with my DivX player and noticed that the DivX player has a streaming option. Confirmed it was a DLNA server and it is easy to
setup
Well turned it on, added a folder and tried it. It works beautifully. I can play .AVI, MKV, MP4, and M4V files without any issue. Can fast-forward and rewind with no issues. Bar none, works with no issue, and I strongly recommend it. The only issue I could see is that I need to have the player running, unlike a service, but for perfectly playing files to a Blu-Ray player over wireless, that is a very, very small issue.
DLNA Servers for Windows
Know this is a little off base for my blog, but hey it is kind of virtual, and it is useful. The other day I picked up a new Blue-Ray player and it had DLNA capabilities, so I wanted to try it and test it out with a DLNA server.
Did some research with
Wikipedia and the one product came to the front,
Mezzemo. I gave it a try and while the software was easy to set up, I was having a very difficult time to get it to work with my
Sony BDP-S590, and only 1 file was playing. Did some further research and there were many other persons saying that this model was giving it some problem.
So today I was doing some work with my DivX player and noticed that the DivX player has a streaming option. Confirmed it was a DLNA server and it is easy to
setup
Well turned it on, added a folder and tried it. It works beautifully. I can play .AVI, MKV, MP4, and M4V files without any issue. Can fast-forward and rewind with no issues. Bar none, works with no issue, and I strongly recommend it. The only issue I could see is that I need to have the player running, unlike a service, but for perfectly playing files to a Blu-Ray player over wireless, that is a very, very small issue.
Today I found this announcement of new products for the
dx360 M4
Now I normally don't use this model of computer, but just decided to look at it. So I looked at the specs of the
server then saw the specs of two of the cards, the NVIDIA Tesla K20, and the
NVIDIA VGX K1 / K2
The server can handle 2 half length full height cards, with 2 servers in a 2 u space, so that is 4 GPUs in 2U.
The K20 was just a number cruncher, nothing exciting there, could be used for mathematics, or large scale models or something like that. but the VGX K1 was interesting. It was a video card that is supposed to be used for virtualized workloads. From their website:
"VGX boards feature NVIDIA Kepler-based GPUs that, for the first time,
allow hardware virtualization of the GPU. This means multiple users can
share a single GPU, improving user density while providing true PC
performance and compatibility."
Now that is interesting. What struck me as more interesting is this. The GPU is supported right now under the following OS's
- XenDesktop with HDX 3D Pro
- XenServer
And is coming for these platforms:
- XenDesktop with HDX
- XenServer with NVIDIA VGX Hypervisor
- RemoteFX
- Windows Server 2012
- VMware View with vSGA
- ESX
And I see that the dx360 M4 supporting these OS's
- Microsoft Windows Server 2008 R2
- Microsoft Windows Server 2008, Datacenter x64 Edition
- Microsoft Windows HPC Server 2008
- Red Hat Enterprise Linux 5 Server with Xen x64 Edition
- Red Hat Enterprise Linux 6 Server x64 Edition
- SUSE Linux Enterprise Server 10 x64 Edition
- SUSE Linux Enterprise Server 11 with Xen x64 Edition
- SUSE Linux Enterprise Server 11 x64 Edition
- VMware ESX 4.1, ESXi 4.1, and 5.0
So if I look and see what both card and Server OS support, right now, there is nothing. Now knowing IBM and what the officially support on their products, I don't see XenServer being a platform that they will add. And I don't see any development of support of the VGX on RedHat which would say it would be supported by KVM. I can see This server being supported by Windows 2012 when things get rolling, and that leaves one thing in the wings...
..VMware. I am guessing that there might be an upgrade on the hypervisor's part for it to better handle virtual GPUs. For vSphere and for View. I don't think IBM would work on and develop a > $3500 video card for a server that no platform will support.
I guess we will have to wait and see.
High End Video Cards, IBM servers and Virtulization.
Today I found this announcement of new products for the
dx360 M4
Now I normally don't use this model of computer, but just decided to look at it. So I looked at the specs of the
server then saw the specs of two of the cards, the NVIDIA Tesla K20, and the
NVIDIA VGX K1 / K2
The server can handle 2 half length full height cards, with 2 servers in a 2 u space, so that is 4 GPUs in 2U.
The K20 was just a number cruncher, nothing exciting there, could be used for mathematics, or large scale models or something like that. but the VGX K1 was interesting. It was a video card that is supposed to be used for virtualized workloads. From their website:
"VGX boards feature NVIDIA Kepler-based GPUs that, for the first time,
allow hardware virtualization of the GPU. This means multiple users can
share a single GPU, improving user density while providing true PC
performance and compatibility."
Now that is interesting. What struck me as more interesting is this. The GPU is supported right now under the following OS's
- XenDesktop with HDX 3D Pro
- XenServer
And is coming for these platforms:
- XenDesktop with HDX
- XenServer with NVIDIA VGX Hypervisor
- RemoteFX
- Windows Server 2012
- VMware View with vSGA
- ESX
And I see that the dx360 M4 supporting these OS's
- Microsoft Windows Server 2008 R2
- Microsoft Windows Server 2008, Datacenter x64 Edition
- Microsoft Windows HPC Server 2008
- Red Hat Enterprise Linux 5 Server with Xen x64 Edition
- Red Hat Enterprise Linux 6 Server x64 Edition
- SUSE Linux Enterprise Server 10 x64 Edition
- SUSE Linux Enterprise Server 11 with Xen x64 Edition
- SUSE Linux Enterprise Server 11 x64 Edition
- VMware ESX 4.1, ESXi 4.1, and 5.0
So if I look and see what both card and Server OS support, right now, there is nothing. Now knowing IBM and what the officially support on their products, I don't see XenServer being a platform that they will add. And I don't see any development of support of the VGX on RedHat which would say it would be supported by KVM. I can see This server being supported by Windows 2012 when things get rolling, and that leaves one thing in the wings...
..VMware. I am guessing that there might be an upgrade on the hypervisor's part for it to better handle virtual GPUs. For vSphere and for View. I don't think IBM would work on and develop a > $3500 video card for a server that no platform will support.
I guess we will have to wait and see.
Currently I have the need to build a new Windows XP Guest in VirtualBox. So I figure that I want the latest and greatest so that I wont have to keep upgrading it.
On the OS side, I want it to be pre-installed with SP3, and possibly some or all of the patches
On the Virtual Hardware side I want for the Hard drive to be SATA, not IDE, and for the bridge to be ICH9, not PXII3.
My ultimate goal is for it to be point and shoot, no installing as IDE / PXII3 and convert, but to choose SATA / ICH9 straight from the start. Also want to do it without any other tools like nlite. Starting work today, lets see where this gets us
Building new Windows XP Guest
Currently I have the need to build a new Windows XP Guest in VirtualBox. So I figure that I want the latest and greatest so that I wont have to keep upgrading it.
On the OS side, I want it to be pre-installed with SP3, and possibly some or all of the patches
On the Virtual Hardware side I want for the Hard drive to be SATA, not IDE, and for the bridge to be ICH9, not PXII3.
My ultimate goal is for it to be point and shoot, no installing as IDE / PXII3 and convert, but to choose SATA / ICH9 straight from the start. Also want to do it without any other tools like nlite. Starting work today, lets see where this gets us
I was patching my ESXi server today with the VMware Host Update Utility and was thinking about a couple of things. First when I do an update the VMU first downloads a bunch of data to my C:\Documents and Settings\All Users\Application Data\VMware\VMware VI Update\vmw, about 1.2GB of data.
I was thinking that if I wanted to switch back to using a scripting tool then I would have to re-download all of the patches again manually and then script it up. So I wanted the shortcut to see if I really needed to download it again. Inside the
MetaData directory, there are four zip files; 4.0 ESX and ESXi, and 4.1 ESX and ESXi. and then in the
vibs directory there are a bunch of vibs files ranging from 60 to 130 MB. Those had to be the patches.
Any search on how to open a VIBS file came up empty so I then looked at the Metadata zips again and opened them all up. Inside there is a file called Packages. Once I looked into it I noticed that it was all names of the patches, but was was most interesting was the filename was a .deb file.
So I renamed one of the .vibs file to a .deb copied it over to my Linux server and ran the command ar vx something.deb, and viola, it opened up and showed its contents.
Unfortunately for me, it looks like the contents inside the .deb / .vibs file is not easily compatible the downloaded manual patches, but I learned a little more on how the VMware VMU architecture works.
What I found very interesting was that even though it was for ESXi, these are debian patch packages, so still somewhere in that tiny ESXi Hypervisor, there is some Linux, however small.
Thanks to
http://www.g-loaded.eu/2008/01/28/how-to-extract-rpm-or-deb-packages/ on how to extract DEB packages
Cracking the contents of the VMware VMU vibs files
I was patching my ESXi server today with the VMware Host Update Utility and was thinking about a couple of things. First when I do an update the VMU first downloads a bunch of data to my C:\Documents and Settings\All Users\Application Data\VMware\VMware VI Update\vmw, about 1.2GB of data.
I was thinking that if I wanted to switch back to using a scripting tool then I would have to re-download all of the patches again manually and then script it up. So I wanted the shortcut to see if I really needed to download it again. Inside the
MetaData directory, there are four zip files; 4.0 ESX and ESXi, and 4.1 ESX and ESXi. and then in the
vibs directory there are a bunch of vibs files ranging from 60 to 130 MB. Those had to be the patches.
Any search on how to open a VIBS file came up empty so I then looked at the Metadata zips again and opened them all up. Inside there is a file called Packages. Once I looked into it I noticed that it was all names of the patches, but was was most interesting was the filename was a .deb file.
So I renamed one of the .vibs file to a .deb copied it over to my Linux server and ran the command ar vx something.deb, and viola, it opened up and showed its contents.
Unfortunately for me, it looks like the contents inside the .deb / .vibs file is not easily compatible the downloaded manual patches, but I learned a little more on how the VMware VMU architecture works.
What I found very interesting was that even though it was for ESXi, these are debian patch packages, so still somewhere in that tiny ESXi Hypervisor, there is some Linux, however small.
Thanks to
http://www.g-loaded.eu/2008/01/28/how-to-extract-rpm-or-deb-packages/ on how to extract DEB packages
I have been looking at documents that detail speed improvements with ESX where the partitions are aligned. These documents detail and only deal with SAN paritions:
http://media.netapp.com/documents/tr_3593.pdf
http://www.vmware.com/pdf/vi_performance_tuning.pdf
http://www.vmware.com/pdf/esx3_partition_align.pdf
Now I don't have access to a SAN but wanted to develop and test this with my Direct Attached Storage (DAS) for my ESXi host. Here is the configuration of my ESX host:
Hypervisor OS: ESXi 4.0 Releasebuild 294855
Systemboard: Intel S5000PSL
SCSI Controller: IBM ServeRaid 6M - 128 MB cache
RAID for Testing: RAID5 built with 5 73GB 10K U320 disks.
RAID Stripe Size: 64KB
To do the testing I created two Windows 2003 guests with the following configurations:
OS: Windows 2003 Standard
Service Pack: SP2
Hotfixes: All hotfixes presented over Windows update as of 11/15/2010
Virtual Disk: 12 GB dynamic
Virtual Memory: 512MB
NTFS Format: default (4K)
The only difference is that for SERVERB, the disk was aligned to 64K as described in the documents, and SERVERA had no alignment.
I then tested the servers using iozone.org version 3.53. In order to isolate each server I rebooted the ESX host, then gave it 5 minutes to settle, and started up the Guest target alone with no other guests running with another 5 minutes of settle time before starting the testing.
The tests were done three times for each server and the results were averaged. Then the results for each aggregate server were compared as a percentage difference.
Now the big question, is it worth it. The short answer is yes, I saw an improvement on average of about 10 to 40% per test. There were points where the aligned disk was slower, but if you look at the aggregate of the data there is an improvement. I need to do some more cleanup of the data but I will be posting it soon.
Testing to see if aligned partitions on ESX - an Introduction
I have been looking at documents that detail speed improvements with ESX where the partitions are aligned. These documents detail and only deal with SAN paritions:
http://media.netapp.com/documents/tr_3593.pdf
http://www.vmware.com/pdf/vi_performance_tuning.pdf
http://www.vmware.com/pdf/esx3_partition_align.pdf
Now I don't have access to a SAN but wanted to develop and test this with my Direct Attached Storage (DAS) for my ESXi host. Here is the configuration of my ESX host:
Hypervisor OS: ESXi 4.0 Releasebuild 294855
Systemboard: Intel S5000PSL
SCSI Controller: IBM ServeRaid 6M - 128 MB cache
RAID for Testing: RAID5 built with 5 73GB 10K U320 disks.
RAID Stripe Size: 64KB
To do the testing I created two Windows 2003 guests with the following configurations:
OS: Windows 2003 Standard
Service Pack: SP2
Hotfixes: All hotfixes presented over Windows update as of 11/15/2010
Virtual Disk: 12 GB dynamic
Virtual Memory: 512MB
NTFS Format: default (4K)
The only difference is that for SERVERB, the disk was aligned to 64K as described in the documents, and SERVERA had no alignment.
I then tested the servers using iozone.org version 3.53. In order to isolate each server I rebooted the ESX host, then gave it 5 minutes to settle, and started up the Guest target alone with no other guests running with another 5 minutes of settle time before starting the testing.
The tests were done three times for each server and the results were averaged. Then the results for each aggregate server were compared as a percentage difference.
Now the big question, is it worth it. The short answer is yes, I saw an improvement on average of about 10 to 40% per test. There were points where the aligned disk was slower, but if you look at the aggregate of the data there is an improvement. I need to do some more cleanup of the data but I will be posting it soon.
OK, I know the title is a little long, but it is descriptive. Yesterday I stumbled across the Zabbix appliance and wanted to see what it could do.
Well I am still checking out Zabbix, but I wanted to see if I could run the Zabbix appliance using VirtualBox's native disk format VDI instead of the originally provided VMDK virtual disk.
First off adding the VMDK into VirtualBox is easy as cake
- Download the appliance from www.zabbix.com
- Extract the VMDK and VMX files.
- By looking at the VMX file, you notice the parameters that are pertinent to create
- OS: Linux
- Version: OpenSUSE
- Memory: 512MB
- Storage Controller: SATA
- Network Attached Adapter: Bridged
- Adapter type Intel PRO/1000 MT
- Copy the VMDK to where you keep your VDI files, go to the Virtual Media Manager and add the disk to the list, then attach the disk to the SATA adapter and away you go.
For me it started up fine the first time without any problems.
Now for the fun part; converting the file to VDI
Use the following command:
vboxmanage.exe clonehd
\file.vmdk zabbix.vdi --format vdi
Now you just go to the Virtual Media Manager and attach the VDI and away you go. The one thing that I did learn is that you need to convert the VMDK to a VDI before you start up the machine the first time. So if you did the test with at the top of the article, just delete it and pull a new copy of the VMDK from the archive you download.
Installng Zabbix appliance into Virtualbox with VMDK to VDI conversion
OK, I know the title is a little long, but it is descriptive. Yesterday I stumbled across the Zabbix appliance and wanted to see what it could do.
Well I am still checking out Zabbix, but I wanted to see if I could run the Zabbix appliance using VirtualBox's native disk format VDI instead of the originally provided VMDK virtual disk.
First off adding the VMDK into VirtualBox is easy as cake
- Download the appliance from www.zabbix.com
- Extract the VMDK and VMX files.
- By looking at the VMX file, you notice the parameters that are pertinent to create
- OS: Linux
- Version: OpenSUSE
- Memory: 512MB
- Storage Controller: SATA
- Network Attached Adapter: Bridged
- Adapter type Intel PRO/1000 MT
- Copy the VMDK to where you keep your VDI files, go to the Virtual Media Manager and add the disk to the list, then attach the disk to the SATA adapter and away you go.
For me it started up fine the first time without any problems.
Now for the fun part; converting the file to VDI
Use the following command:
vboxmanage.exe clonehd
\file.vmdk zabbix.vdi --format vdi
Now you just go to the Virtual Media Manager and attach the VDI and away you go. The one thing that I did learn is that you need to convert the VMDK to a VDI before you start up the machine the first time. So if you did the test with at the top of the article, just delete it and pull a new copy of the VMDK from the archive you download.
After a long and hard trial process, I have increased the speed of my RAID5 array on an IBM ServeRAID-6M to a very acceptable level
Before I worked on this, guests on a 5 disk RAID5 were getting 5MB/s and after-wards I am getting the following Speeds
- Windows 2003, 12GB, Read tests with HD_speed are 92 MB/s
- Ubuntu 9.04 server, 8GB Read+Write tests, using dd are 32 MB/s
My second RAID was only 3 disks because I had a problem with 2 of the disks. Here are my suggestions for building a RAID5 from used parts
- Test the READ and WRITE speeds of each disk by itself. I had 1 U320 disk that was reading fine at 60 MB/s but crippled down and would only write at 5 MB/s
- Have the same interface; one disk was a U160, and it could only read at 50 MB/s
- Do not include any disks that are considerably slower than others, it will slow down the whole array.
- Not sure this is true with all Array controllers, but make sure that both the disks and the array are set to write back, not write through. Also the setting for the disks can only be change while they are not in an array, and cannot be change once they are built into an array
These are my preferences, and not sure they will affect anything.
- When building the array use the largest stripe size. The ServeRAID-6M goes up to 64K
- When formatting the VMFS Datastore choose a larger block size like 4MB or 8MB.
Success in improving RAID speeds
After a long and hard trial process, I have increased the speed of my RAID5 array on an IBM ServeRAID-6M to a very acceptable level
Before I worked on this, guests on a 5 disk RAID5 were getting 5MB/s and after-wards I am getting the following Speeds
- Windows 2003, 12GB, Read tests with HD_speed are 92 MB/s
- Ubuntu 9.04 server, 8GB Read+Write tests, using dd are 32 MB/s
My second RAID was only 3 disks because I had a problem with 2 of the disks. Here are my suggestions for building a RAID5 from used parts
- Test the READ and WRITE speeds of each disk by itself. I had 1 U320 disk that was reading fine at 60 MB/s but crippled down and would only write at 5 MB/s
- Have the same interface; one disk was a U160, and it could only read at 50 MB/s
- Do not include any disks that are considerably slower than others, it will slow down the whole array.
- Not sure this is true with all Array controllers, but make sure that both the disks and the array are set to write back, not write through. Also the setting for the disks can only be change while they are not in an array, and cannot be change once they are built into an array
These are my preferences, and not sure they will affect anything.
- When building the array use the largest stripe size. The ServeRAID-6M goes up to 64K
- When formatting the VMFS Datastore choose a larger block size like 4MB or 8MB.
I have been working with a test version of ESX 4i, 4.0 U2 on a USB stick. I installed it the USB stick like I documented on my August 4th post. I like it but seeing some problems. For some reason it is slowing down my system. When I benchmark my ESX host it is only getting 5MB/s on disk access for the guests.
Now these guests are either on a single SCSI U320 disk attached to a ServeRaid-6M, or in a RAID 5 config on that same card, and they are behaving poorly.
I believe that somehow the ESX hypervisor is writing to the USB stick and slowing the whole system down. So I am going back to an installable version on a SCSI disk
ESXi on USB - Part II
I have been working with a test version of ESX 4i, 4.0 U2 on a USB stick. I installed it the USB stick like I documented on my August 4th post. I like it but seeing some problems. For some reason it is slowing down my system. When I benchmark my ESX host it is only getting 5MB/s on disk access for the guests.
Now these guests are either on a single SCSI U320 disk attached to a ServeRaid-6M, or in a RAID 5 config on that same card, and they are behaving poorly.
I believe that somehow the ESX hypervisor is writing to the USB stick and slowing the whole system down. So I am going back to an installable version on a SCSI disk
I found this great little tutorial on how to install ESXi onto a USB stick. I know that there are a bunch of ways, but this was fast, simple, and can be done from windows with tools that I already have: WinRAR and WinImage
http://www.vladan.fr/how-to-install-esxi-40-on-usb-memory-keyGive it a shot.
UPDATE: I use this on a dedicated system so I am not concerned with data loss, but from my tests with 4.0 U2 the hypervisor will grab a partition and format it with VMFS.
ESXi on USB
I found this great little tutorial on how to install ESXi onto a USB stick. I know that there are a bunch of ways, but this was fast, simple, and can be done from windows with tools that I already have: WinRAR and WinImage
http://www.vladan.fr/how-to-install-esxi-40-on-usb-memory-keyGive it a shot.
UPDATE: I use this on a dedicated system so I am not concerned with data loss, but from my tests with 4.0 U2 the hypervisor will grab a partition and format it with VMFS.